Product Release Notes

Release Date: 

May 22, 2026

Click on the highlighted links of the Quick Links menu to jump to the impacted products and features.

Upcoming Webinar

Wednesday, January 21st @ 1:00 PM EDT

Discover the latest QliqSOFT updates designed to help your team communicate more effectively and engage patients like never before. Join us on January 21st to explore powerful features (available and coming soon) including:

  • Expanded Active Directory Integration to streamline user management and enhance security across your organization.
  • Real-time Text language translation in QuincyCHAT that makes it easy to connect with non-English-speaking patients and families.
  • Campaign Text-to-Voice Messaging for reaching patients through automated, conversational voice calls—boosting engagement and response rates.

Don’t miss this opportunity to learn how to maximize your QliqSOFT tools and deliver even better patient experiences in 2026.
Register Today

Quincy

Version Number: 
26.2.1

Virtual Visits / QuincyCHAT

What’s New

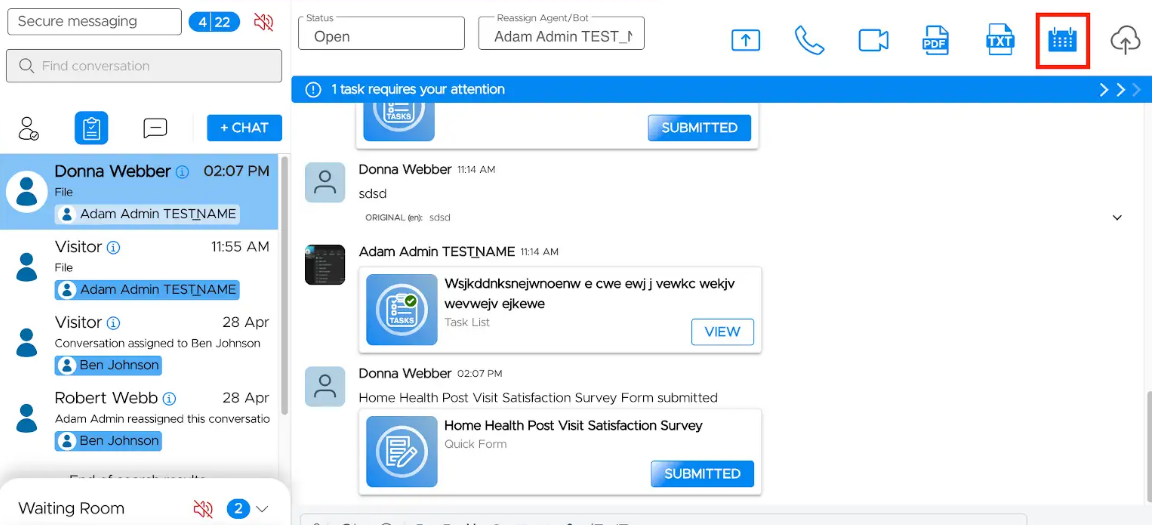
  • Quick Todos and Quick Tasks — Agents can now send structured checklists and task lists directly in patient conversations and staff threads. A new Quick Star (Q + star) menu in the composer groups Quick Messages, Quick Todos, and Quick Tasks into a single entry point.
    • Quick Todos are simple checklists
    • Quick Tasks are richer lists with deadlines (live countdown), reminders, per-task attachment requirements (Document / Photo / Video / Quick Form / Quick Sign), sequential completion, and sender notifications.
  • These enhancements will evolve over the next couple of releases. There will be a client webinar to demonstrate the functionality and discuss anticipated use cases. The table below highlights the capabilities in this release.

Attribute Quick Todos Quick Tasks
Requires QliqSOFT to activate No, Todos are available by default Yes
Approach A simple one-time checklist created by the user Controlled, assignable, and verifiable
Reusable templates that can be edited or deleted by the admin
Templates QliqCHAT  & Quincy users can create and save personal templates The admin can clone and edit templates for all agents to use.
Agents can also create their own templates.
Configuration options A user can create and save Todos templates for their personal use Admins create Tasks that can be used by agents, including order tasks, notifying when done, requiring an attachment, and setting a deadline to complete tasks
Product used QliqCHAT and Quincy Quincy
How tasks are assigned Users send to other users Agents sent to recipients (patients, providers)
Supports attachments No Yes, one attachment per task: Document / Photo / Video / Quick Form / Quick Sign
Task assignment Create or select a new To do or use a personal template and assign it to another QliqCHAT user Create or select a template, attach it to a recipient (patient, provider) message, and send
Task tracking QliqCHAT: Not currently
QuincyCHAT: Todos: Open and completed statuses
Tasks: Open, submitted, and completed statuses
Task completion The sender is notified when a task is completed. The sender can see the status when the list is open and in the chat thumbnail When a recipient saves and submits their response, the list is locked, and the sender is notified.
Reporting Not currently Not currently
Pricing n/a - This is a complementary enhancement These robust capabilities will be available for purchase

Improvements

  • Search QuincyCHAT conversations by agent name — Users can now search for and display assigned agent names, returning all conversations the agent is a participant in or has sent messages in.

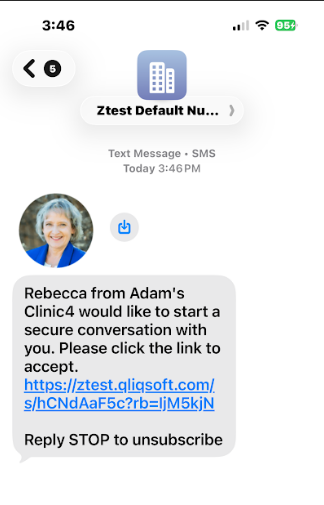
  • Image attachment when starting a conversation from +CHAT — The Start Conversation modal now supports sending an alternative image as an MMS attachment. Senders can choose from the organization logo, sender avatar, chat widget logo, OR upload a custom image.  This can be helpful, for example, by sending an image of the staff member who will be visiting a patient’s home, so they trust it is safe to answer the door.

Bug Fixes

  • Widget name displays correctly on the QuincyCHAT page — Resolved an issue where a number appeared in place of the widget name when switching between groups/widgets.

Chatbots

Chat Widgets

What’s New

  • Role-based scheduled assignment for Chat Widgets — Widgets can now route new conversations to an Agent Role on a schedule instead of to named agents. Admins must create Agent Roles per widget, assign agents, and build recurring shift schedules (daily/weekly/monthly/custom) using built-in templates (24×7, Business hours, Non-business hours). A new Notify Role routing rule alerts primary-shift agents first and, after a no-response timeout, falls back to backup-shift agents. The role name and avatar appear as the conversation assignee in QuincyCHAT, and the calendar supports a historical view, so past dates show the schedule exactly as it was configured at that time. 
To use this capability, the administrator:
  1. Contacts support, as permission needs to be activated by QliqSOFT
  2. Adds the Agent roles to the widget  - click on the Add Role button. The Add Role modal opens. Add a role and optionally add a description and upload an avatar.
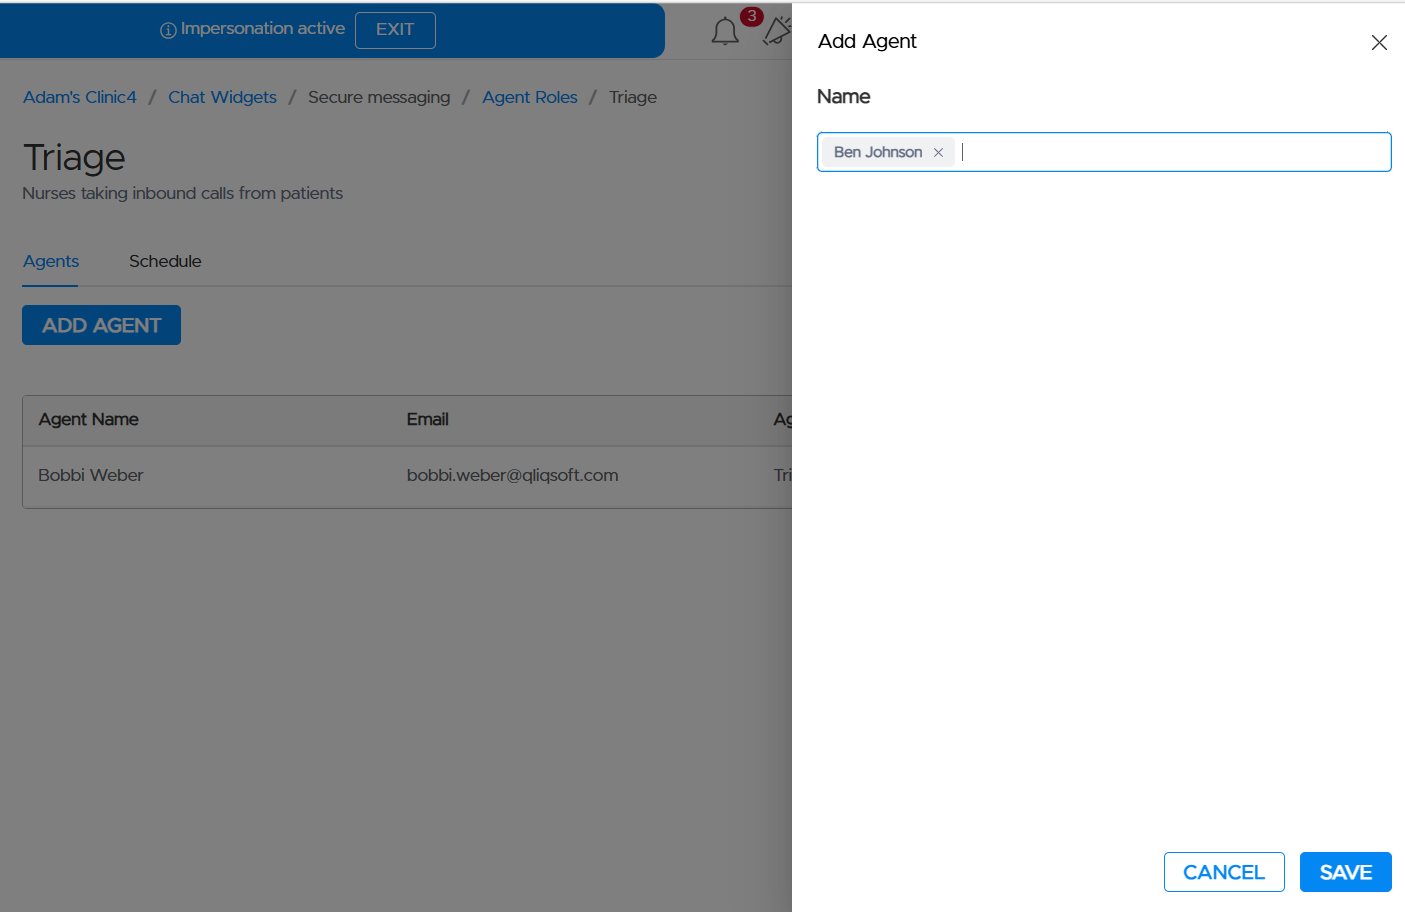
  1. Adds agents to the role in bulk - From the Agent Roles screen, click on the role name that you want to add agents.  Select Add Agent. A modal pops up that enables you to add permissions to agents assigned to the widget. Click Save.
  1. Alternatively, if you are adding a new agent, from the Agent screen, select the user that you want to add as an agent by clicking on Add Agent. The add Agent modal opens. Select the Name of the user, select the role in the Assign Role drop-down and press save.
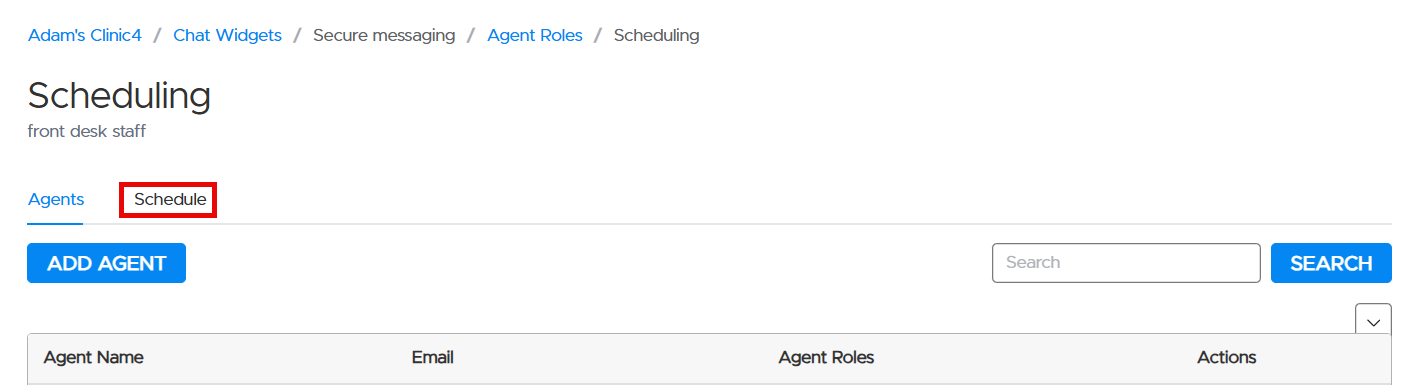
  1. Defines Agent Schedules - From the Agent Roles screen, select the Agent Role you wish to edit. Select Schedule.
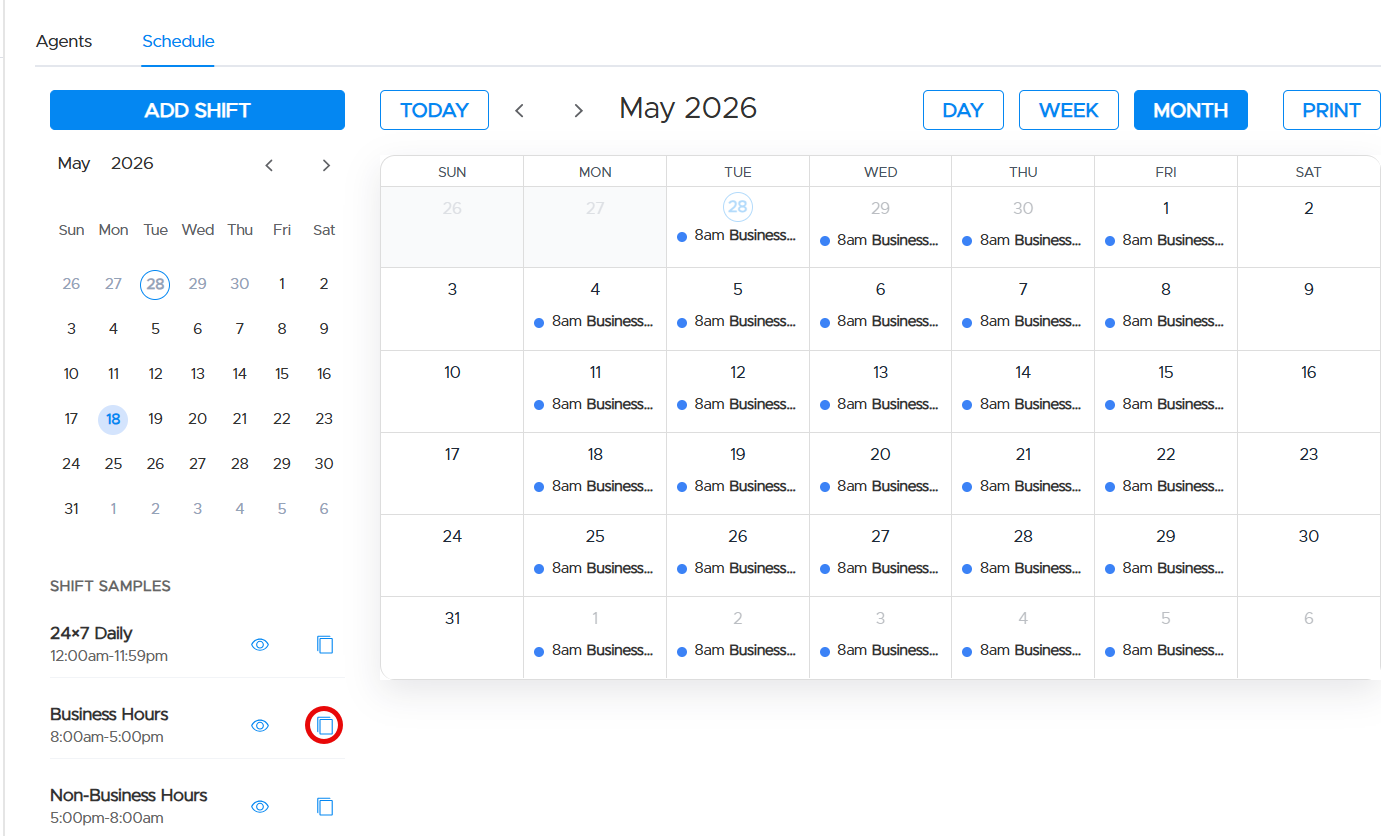
  1. Assigning roles to shifts is required.  To use a shift template, navigate to Shift Samples and click on the copy button.  The shift schedule will be applied to the calendar.
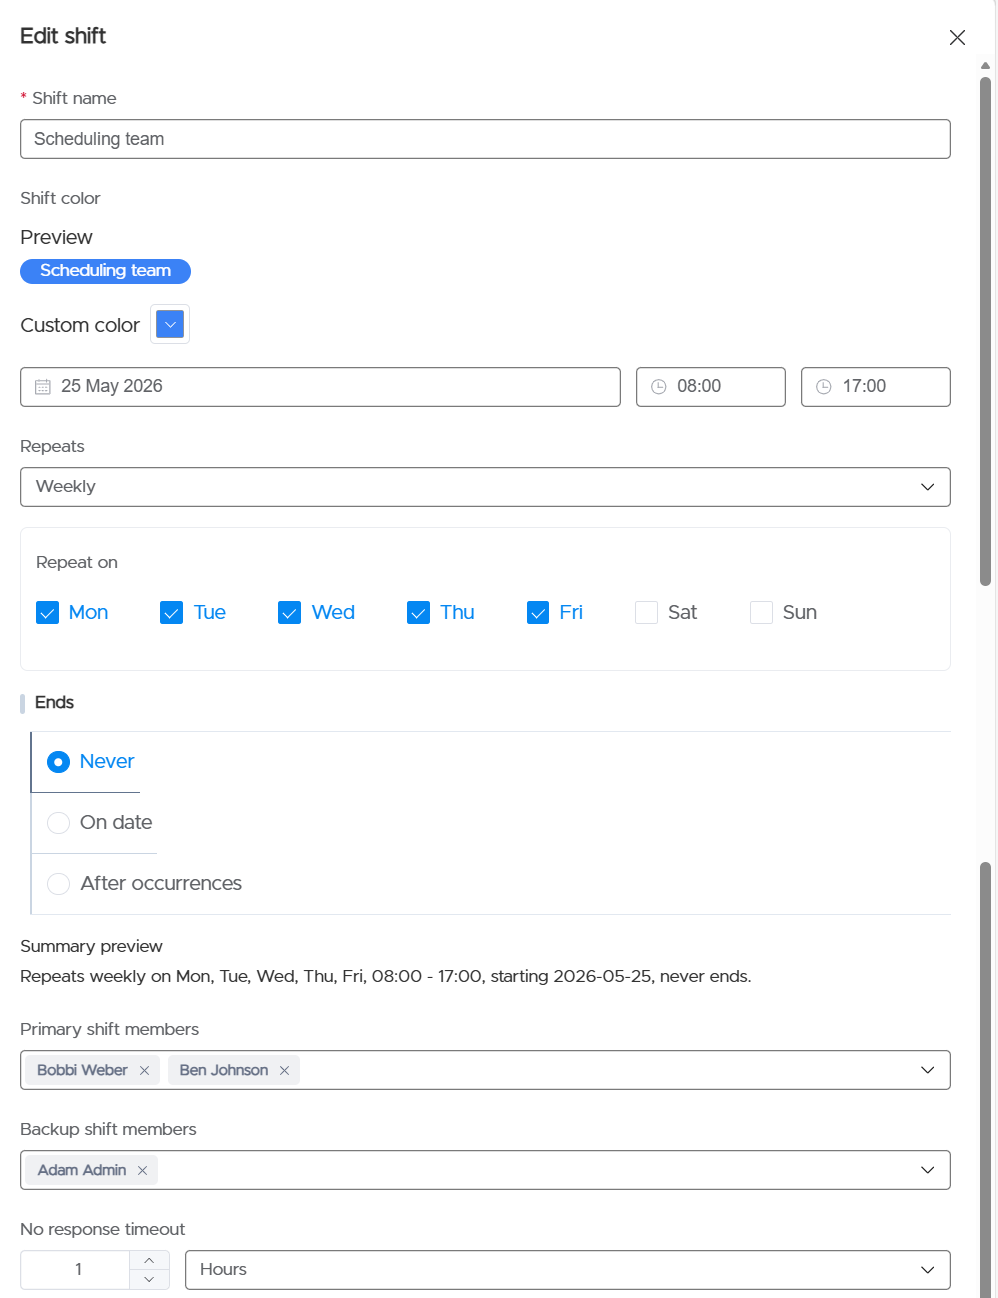
  1. To edit the shift, click on the desired shift in the calendar. An Edit Shift screen opens, where you can configure the schedule  to meet your specific needs and then press save.
    • Enter a shift name
    • Select the color to be displayed on the calendar
    • Select the start date and the start and end time for the shift
    • Select the repeat frequency
    • Select the days of the week that the role will support
    • Select an end date
    • Select the primary shift members
    • Select the backup shift members
    • Select the amount of time during which the primary shift members do not respond before the recipient is redirected to the backup shift member
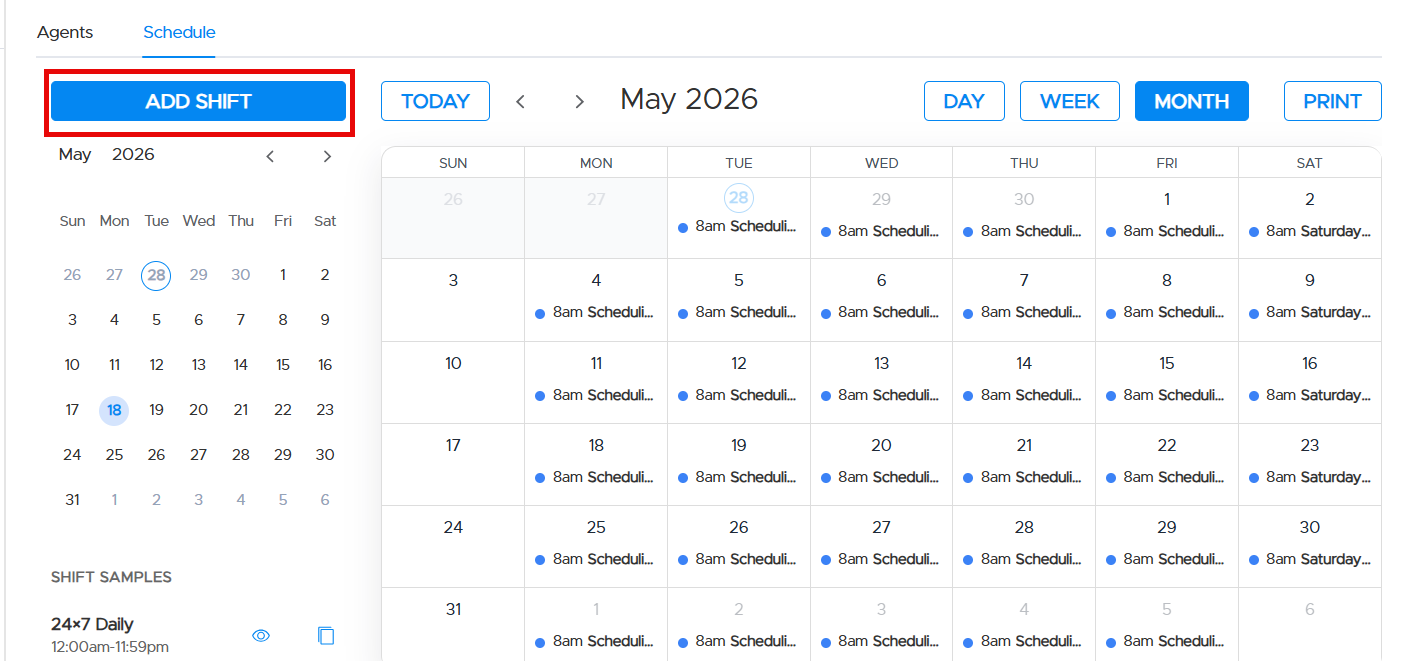
  1. To create a custom shift, click on the Add Shift button.  An Edit Shift screen opens, where you can configure the schedule  to meet your specific needs and then press save
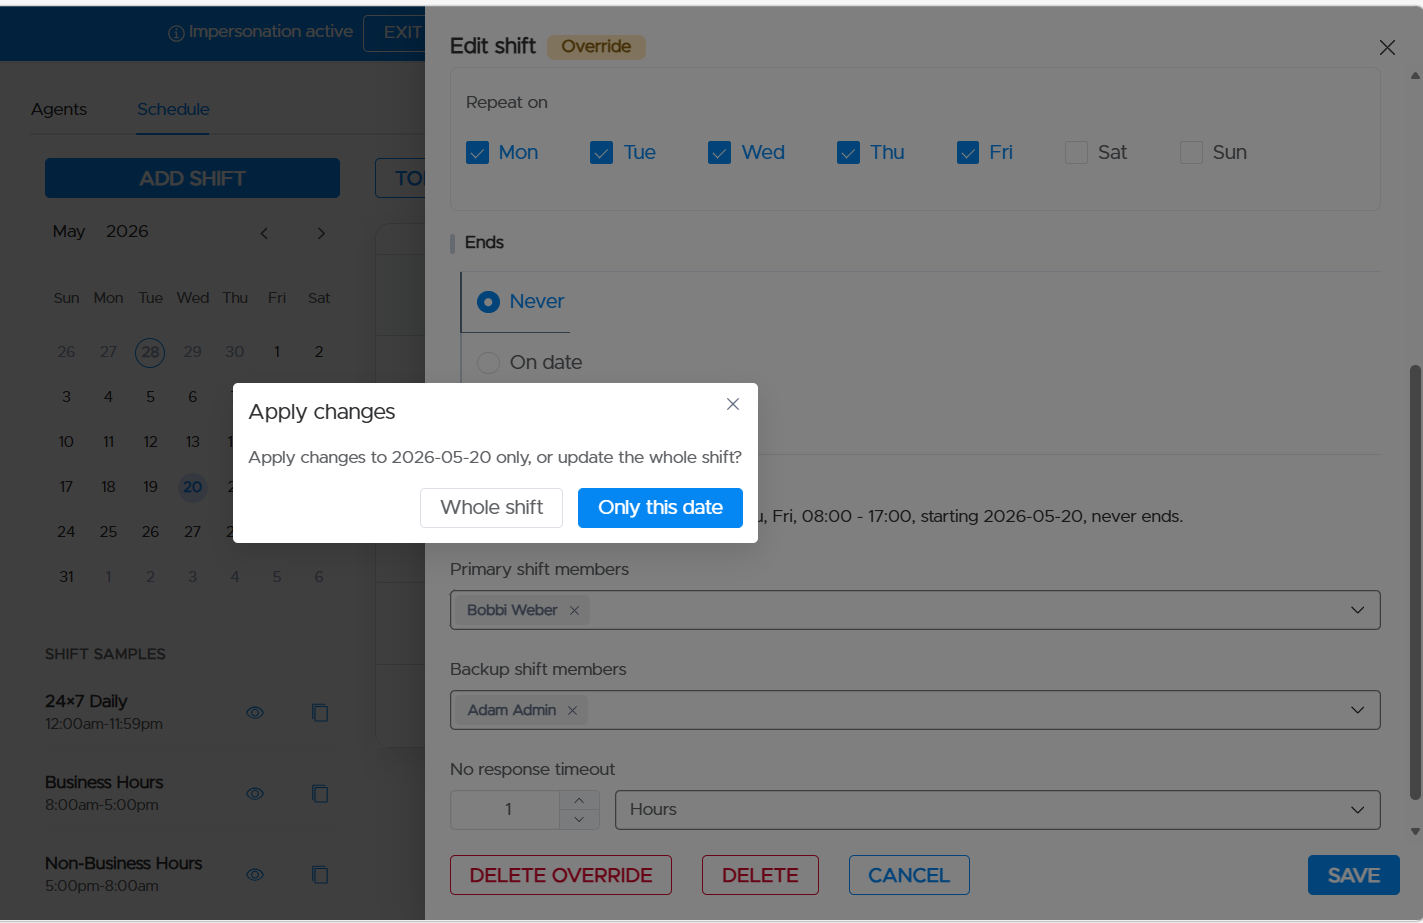
  1. To edit a particular shift, click on the day the change is effective.  An Edit Shift screen opens, where you can edit. Press Save. The Apply Changes screen opens. Select Only This Date if the change is limited to the selected date, or select Whole Shift if the change is effective going forward.
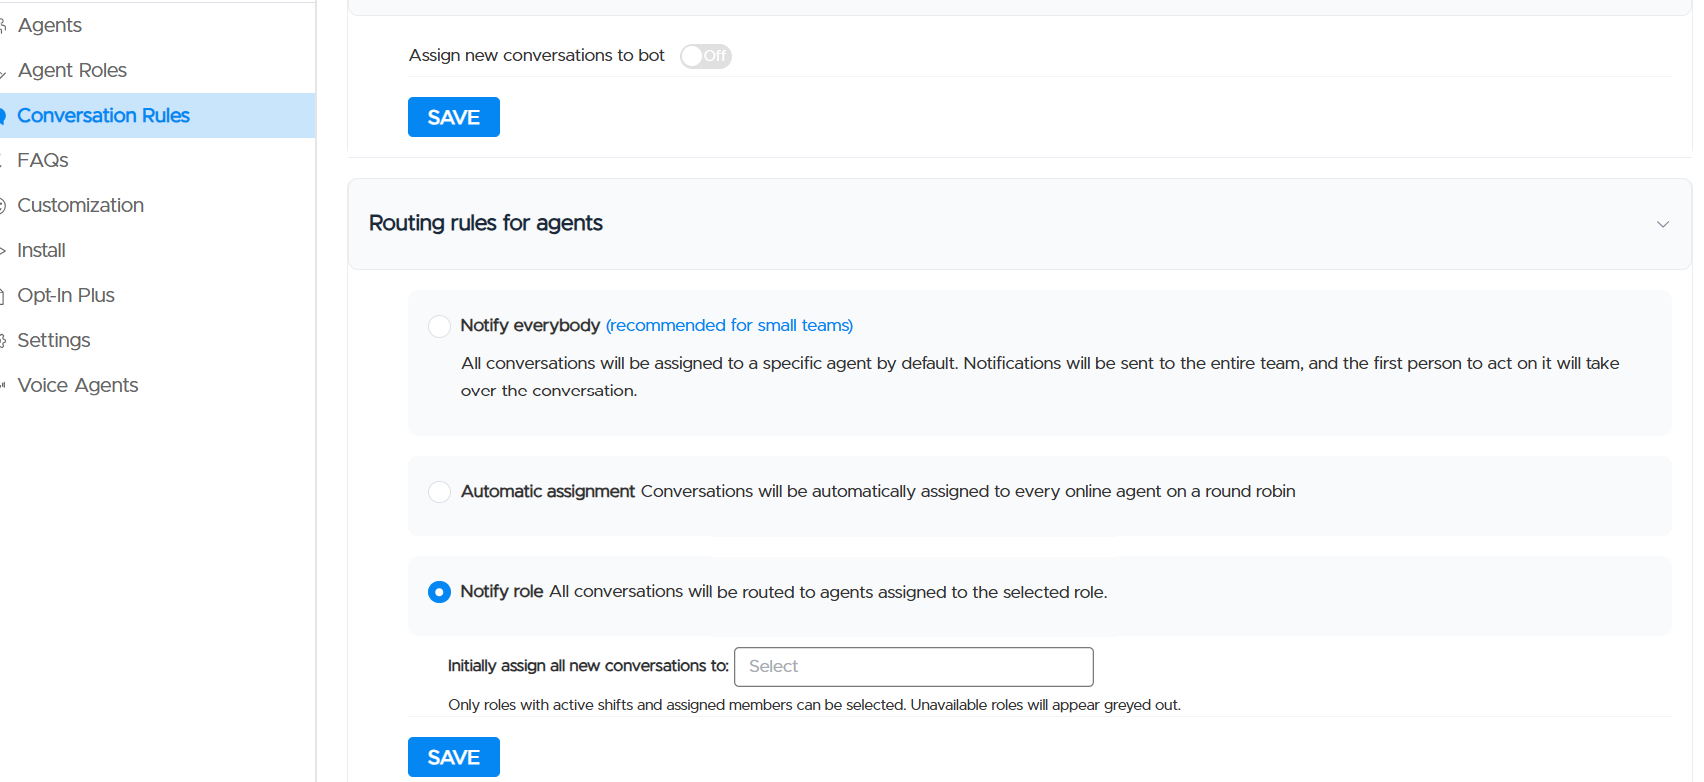
  1. Finally, assign the widget's routing rules. Open Conversation Rules and Activate Notify Role.  Assign the primary role that will be used. Administrators can escalate to a chatbot or assign to a role.  Only roles with active shifts and assigned members can be selected. Unavailable roles will appear greyed out. For this first release, one role can be assigned per widget.  QliqSOFT plans to add chatbot routing in a future release.
  • Once the roles and schedules are configured,
  •  The administrator can view the schedule details by selecting the date(s) and desired timeframe. Additional schedule details can be viewed by clicking on the configured schedule.
  • When a new conversation is initiated by a visitor or patient:
    • All primary‑shift agents in the selected role with an active schedule receive a notification.
    • If no agent responds (no one takes over the conversation) within the defined timeout:
      • Notifications are sent to backup‑shift agents within the same role.
  • Agents who are not part of the role:
    • Can see the conversation in the All tab.
    • Will not receive a notification
  • Notification behavior follows the existing logic used for new messages, escalations, and assignments in agent‑initiated conversations.For each notified agent:
  • If the agent is online in QuincyCHAT (All Conversations tab open):
    • Play a chime
    • Show a red notification indicator
  • If the agent is not online in QuincyCHAT but Quincy is open:
    • Send a web notification
  • If Quincy is not open:
    • Check if the agent is logged into QliqCHAT
      • If yes, send a QuincyCHAT notification
      • If no, send SMS and/or Email notifications
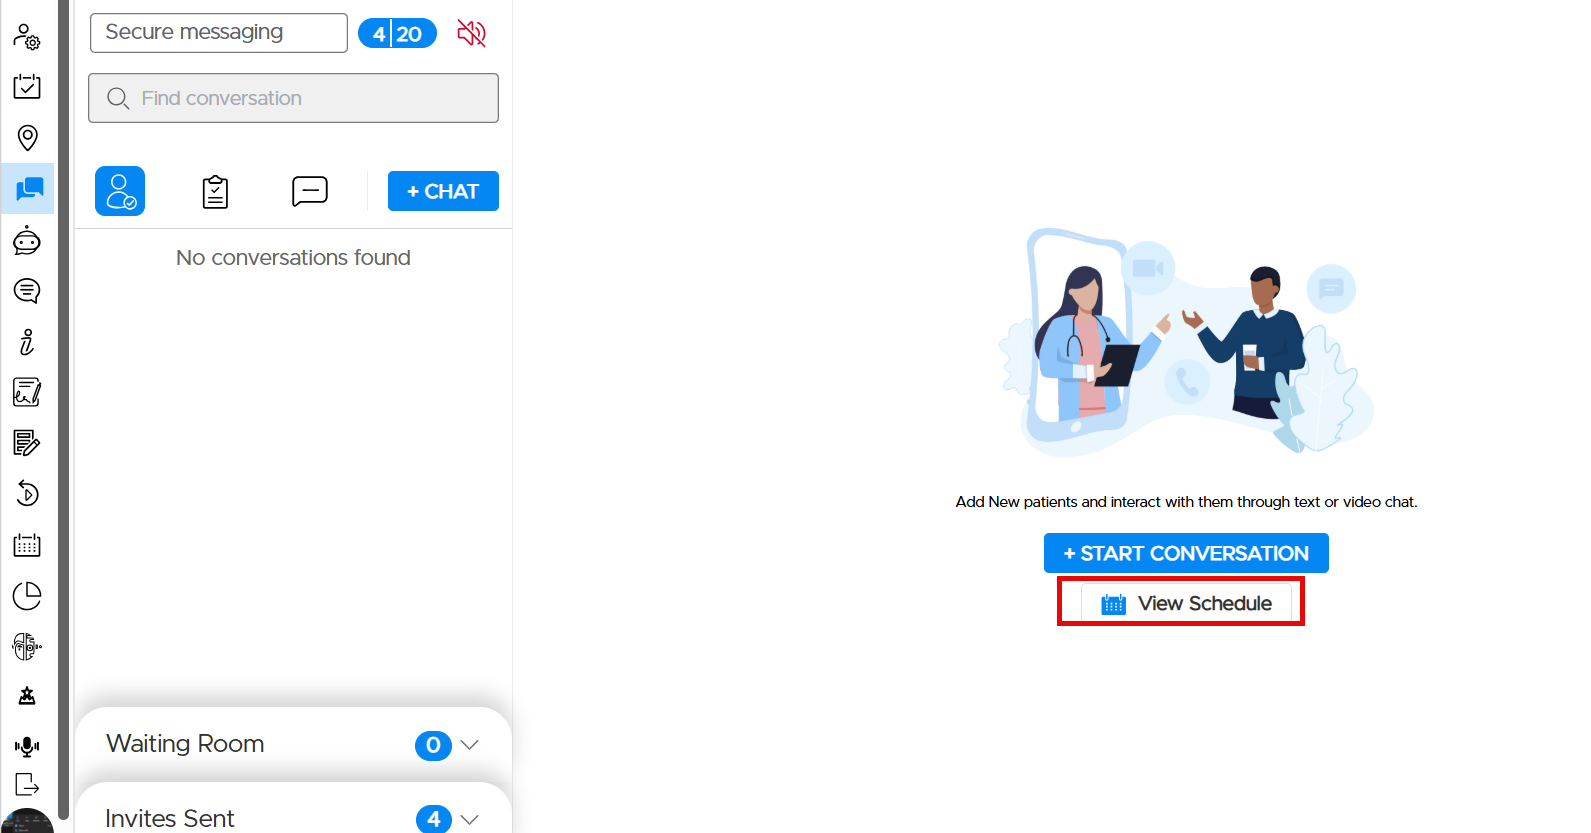
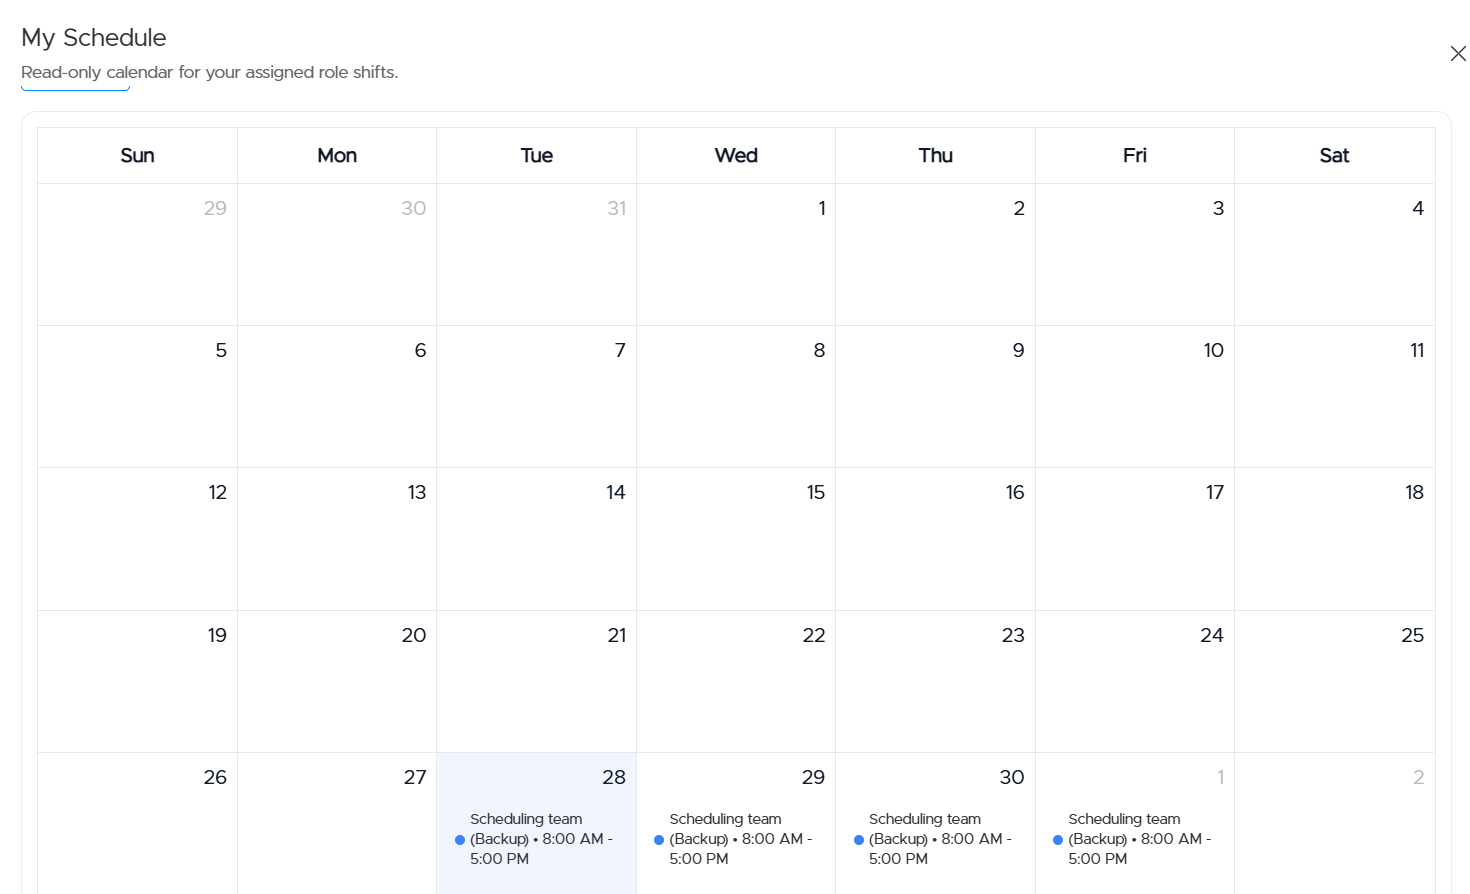
  • The agent can access their schedule in QuincyCHAT 
    • by clicking on the View Schedule button.
  • By clicking on the schedule icon
  • The agent can view the dates and times that they are scheduled and if they are primary or back up.

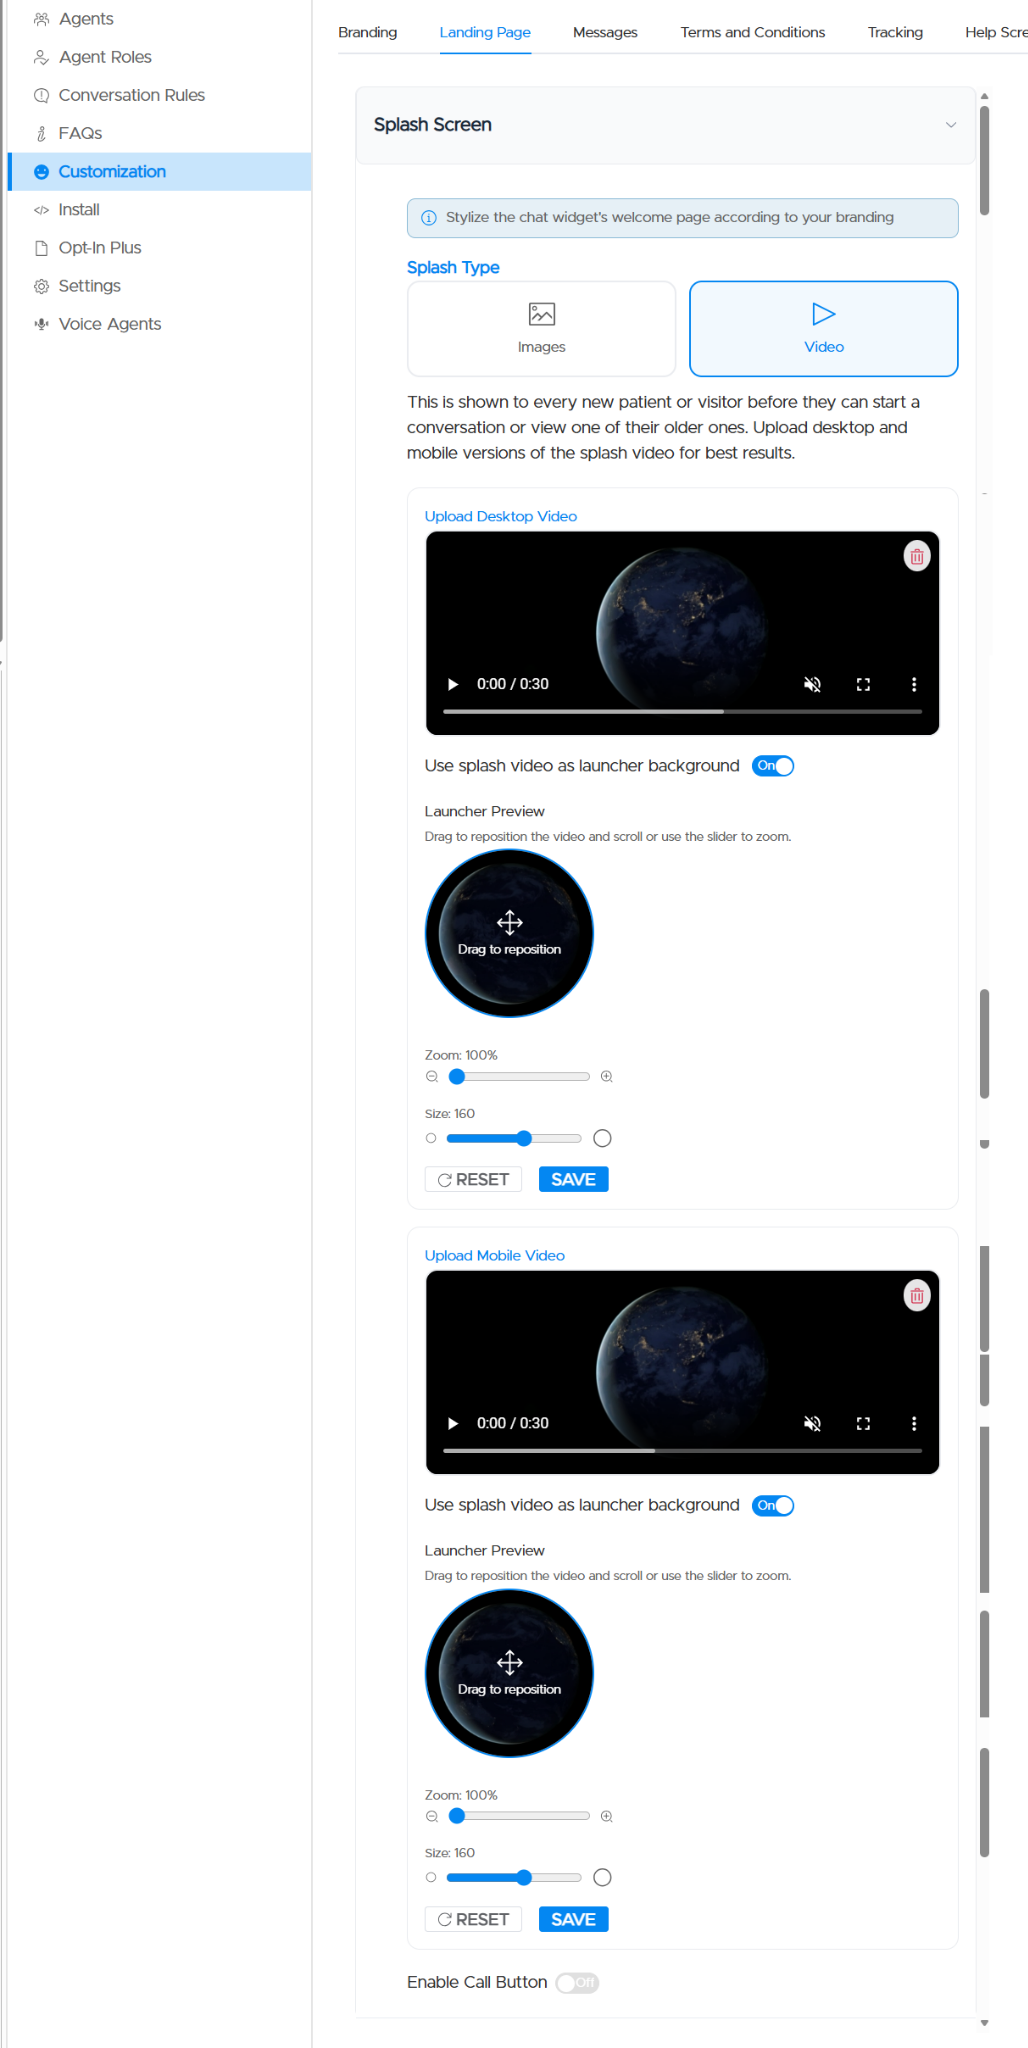
  • Video support on Chat Widget launcher and splash screen — Customers embedding widgets on external websites must be able to use video instead of static images to increase trust and engagement. 
  • Admins can upload desktop and mobile splash videos and optionally reuse them as the launcher background (autoplay, muted, looping). The splash player supports full controls, including play/seek, volume, speed, and fullscreen. To configure the Splash Screen in the widget, navigate to Customize, select Landing Page and follow the prompts.

Improvements

  • Call action on Chat Widget landing page splash — Admins can enable a Call button that, on mobile, opens the phone dialer prefilled with the widget's number; on desktop, displays a readable "Call us at …" line. This action transfers the caller to an organizational number outside of Quincy.

Quick Sign

Improvements

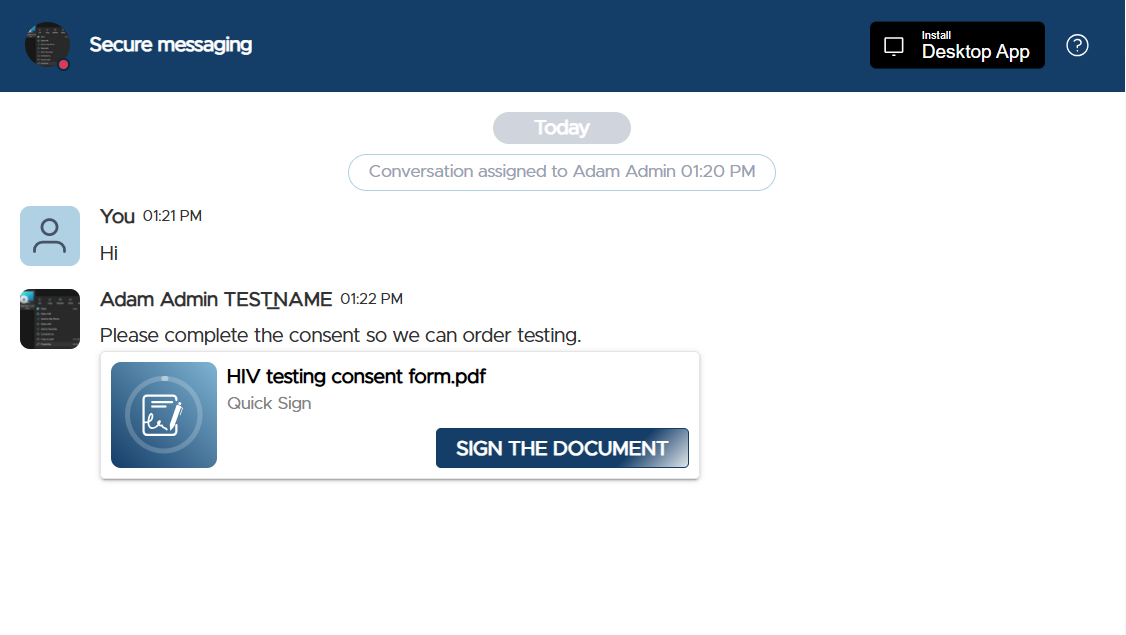
  • Quick Sign email notifications now use a clickable button — Email notifications for Quick Sign now present the document as a clickable button instead of a link.


  • Multi-select status filter on Quick Sign Submissions — Status boxes on the Submissions page now support toggling multiple statuses at once, with highlight indicators and two-way sync with the Status filter input.

  • Edit and manage existing checkbox Field Groups in the Quick Sign builder — Builders can edit them in place instead of recreating them.

Bug Fixes

  • Next button skips satisfied checkbox groups during Quick Sign signing — Once a checkbox group's "Only one" rule is satisfied, Next now skips the remaining boxes in that group.

  • Progress bar stops showing required-field indicators on optional-only Quick Sign documents — When a document contains only optional fields, the progress bar no longer includes a required-fields indicator or count.

Quick Forms

Improvements

  • Improved radio button visibility — Radio buttons now have stronger border contrast and a clearer difference between selected and unselected states.

  • Improved checkbox visibility in Patient UI — Checklist-field checkboxes have higher contrast, clearer borders, and larger touch targets on mobile.

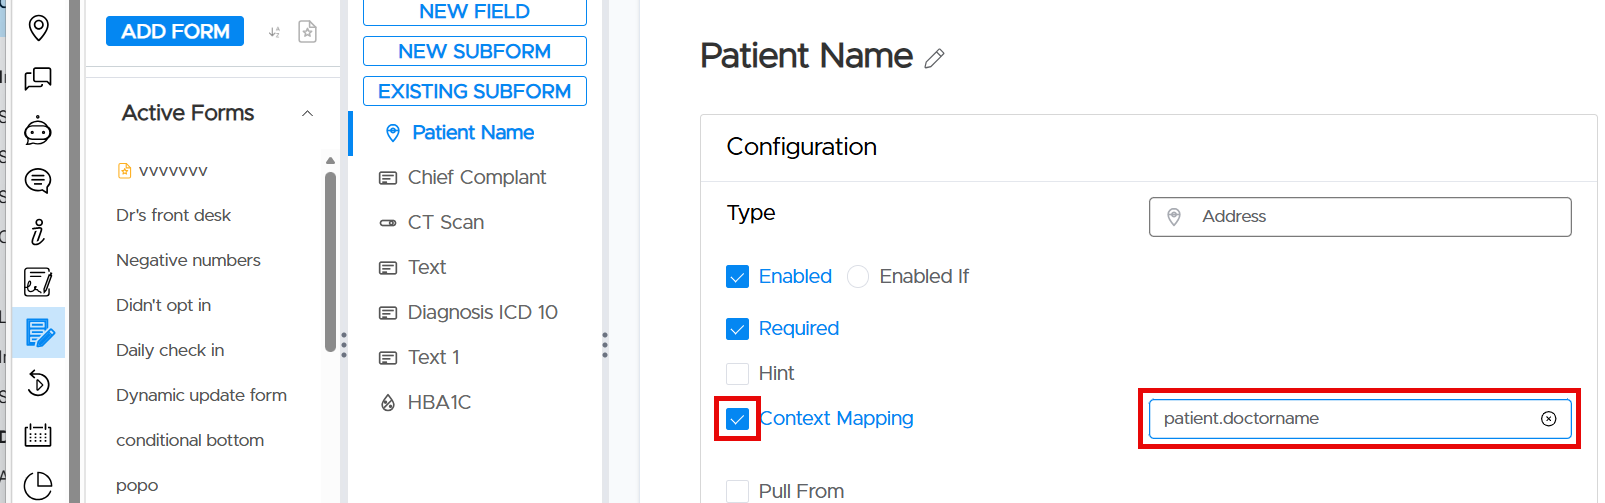
  • Mustache templates in Quick Forms in field labels — Field labels now accept Mustache syntax referencing standard and custom attributes, enabling dynamic labels and dynamic webhook payload keys to communicate with your EMR. To use Mustache templates:
Prepare patient data
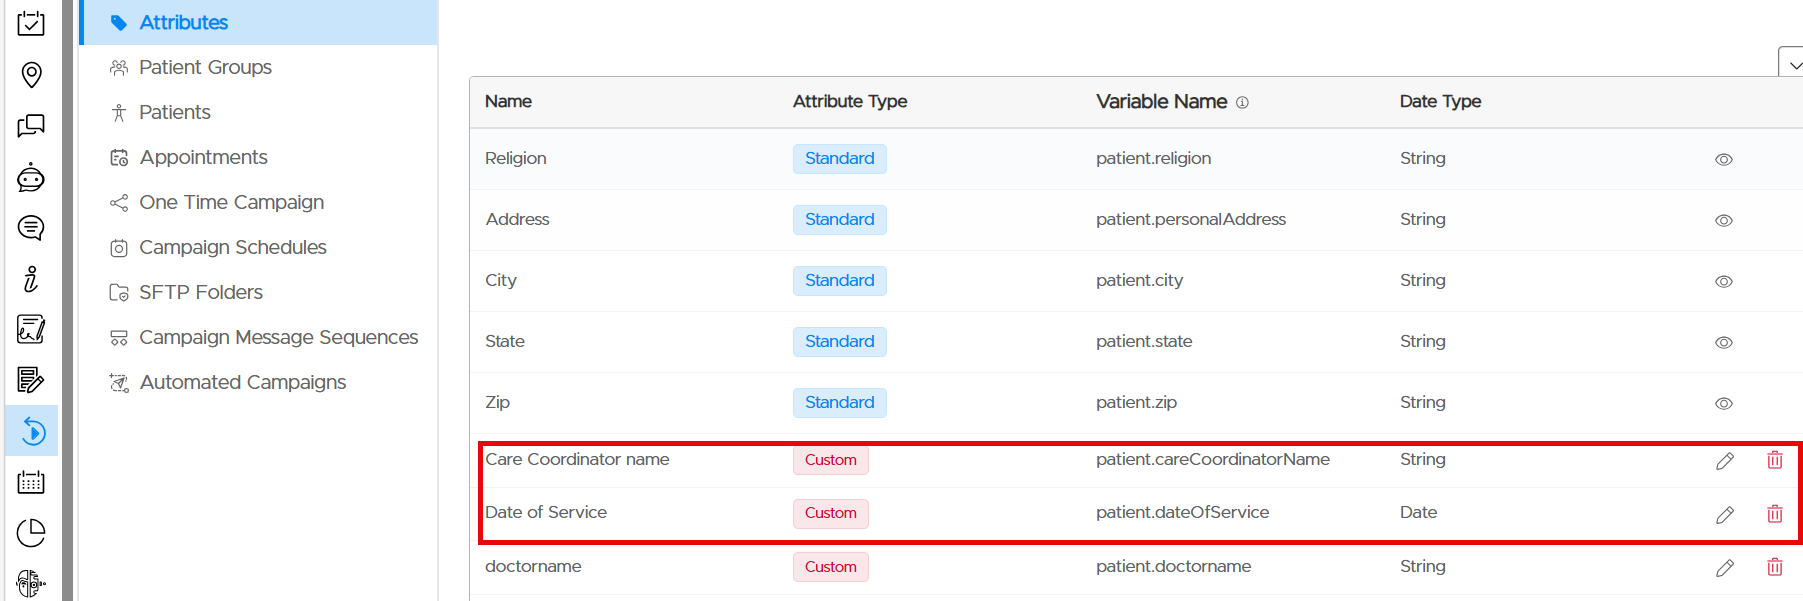
  1. Create the custom attribute(s) that you want to include in the form by navigating to Care Campaigns, Attributes, and then adding a Custom Attribute.
  1. Access the CSV to update patient data by navigating to Care Campaigns, Patients, and selecting Import CSV File.  The Add New Patient window opens.  Download CSV This file now contains the custom attributes.
  1. This file can be used to update existing and new patient data.
Configure the form
  1. Navigate to Quick Forms. Build or select the form to edit. Use the Mustache syntax in the field label
  2. Select the attribute to use by activating the Contact Mapping and selecting the field to map into the third party system.
  • Score information included in Scored Form webhook payloads — Webhook payloads for scored form submissions now include score and classification details.

  • Scored Forms version filter defaults to the most recent version — Previously defaulted to blank; now defaults to the latest version, so admins are viewing data from the most recent version.

Bug Fixes

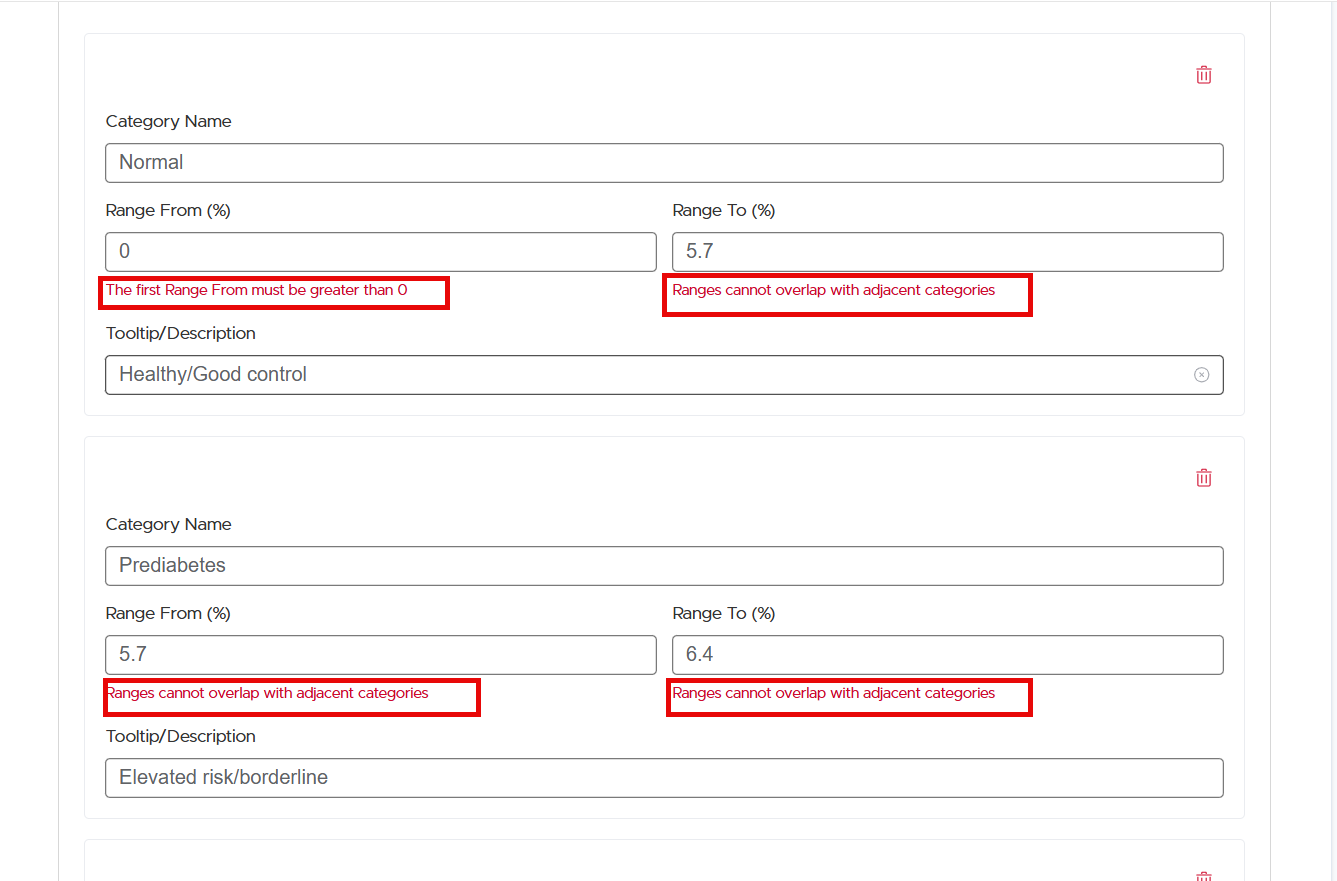
  • HBA1C scored form custom category ranges no longer overlap; validation added — Admins can now configure custom HBA1C from ranges with validation: to save, the first range must be greater than 0 and ranges cannot overlap. Admins are presented with messages of data issues that need to be resolved before saving.

Care Campaigns

What’s New

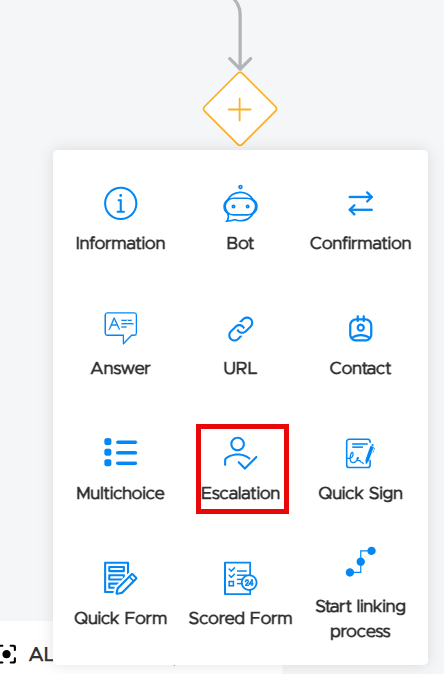
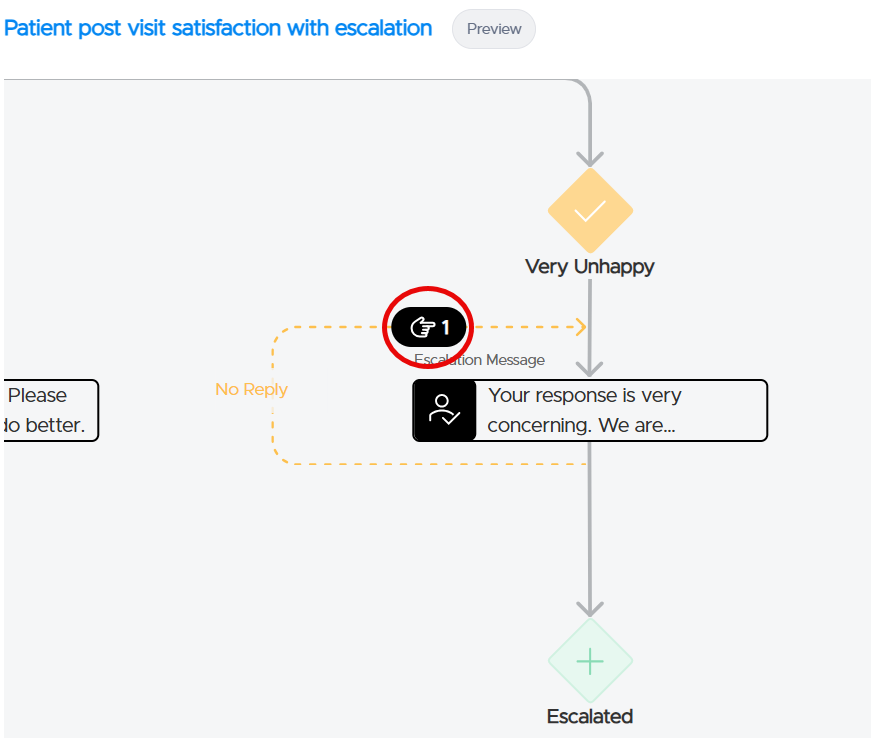
  • Escalation in Auto Campaigns — A new Escalation node in the sequence builder lets campaigns hand off to a live agent when a recipient needs attention. When triggered, the system opens a new conversation in the campaign's chat widget, assigns an agent, and notifies them via SMS + email (with nudges if they don't respond). The recipient receives an invitation link once the agent opens the thread; the primary campaign flow continues uninterrupted. QuincyCHAT shows an Escalation Context panel with the triggering campaign, event, and timestamps, and admins can track outcomes in the new Escalations Report (Reports module) with filterable columns for campaign, recipient, assigned agent, response time, and CSV export. 
  • The escalation node is added to the care sequence.
  • Administrators can add nudges using the same workflow as other nodes.
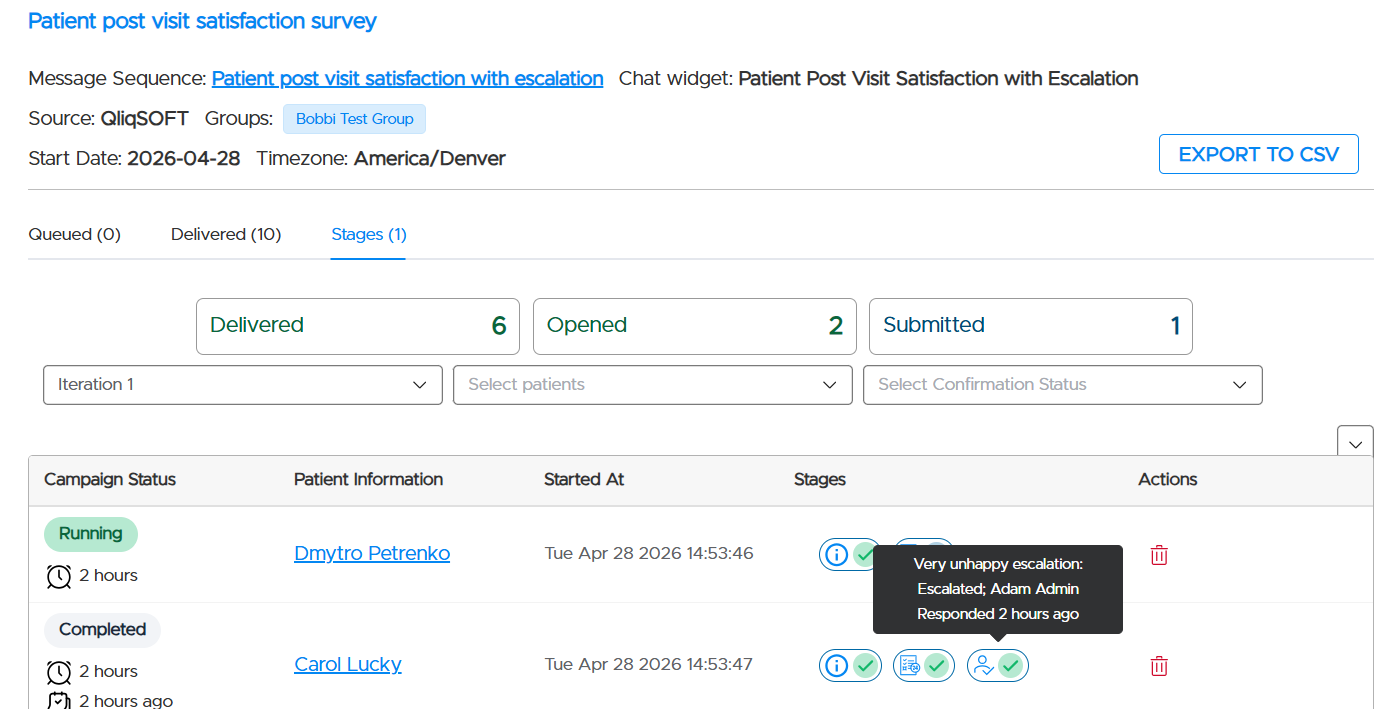
  • Admins can see escalations in the existing campaign report as part of the Stages view.
  • Agents view escalations in QuincyCHAT. Clicking on the Form Name opens the completed survey and score, if applicable.
  • A focused review of escalations can also be viewed in Reports under Campaigns and Escalations.
  • Special Days messaging with patient religion targetingAuto Campaigns can now run optional Secular and Religious holiday sequences alongside the primary sequence. Admins running long-running Medicare / bereavement-style Auto Campaigns can configure holiday outreach to the same enrolled recipients without creating manual one-off campaigns each year. 
  • Admins build sequences grouped by religion (Christian, Jewish, Hindu, Muslim); the system picks the right one per recipient using a new patient Religion attribute (available on Add/Edit Patient, the Patient Attributes table, and CSV import/export). U.S. holiday dates are updated dynamically each year.
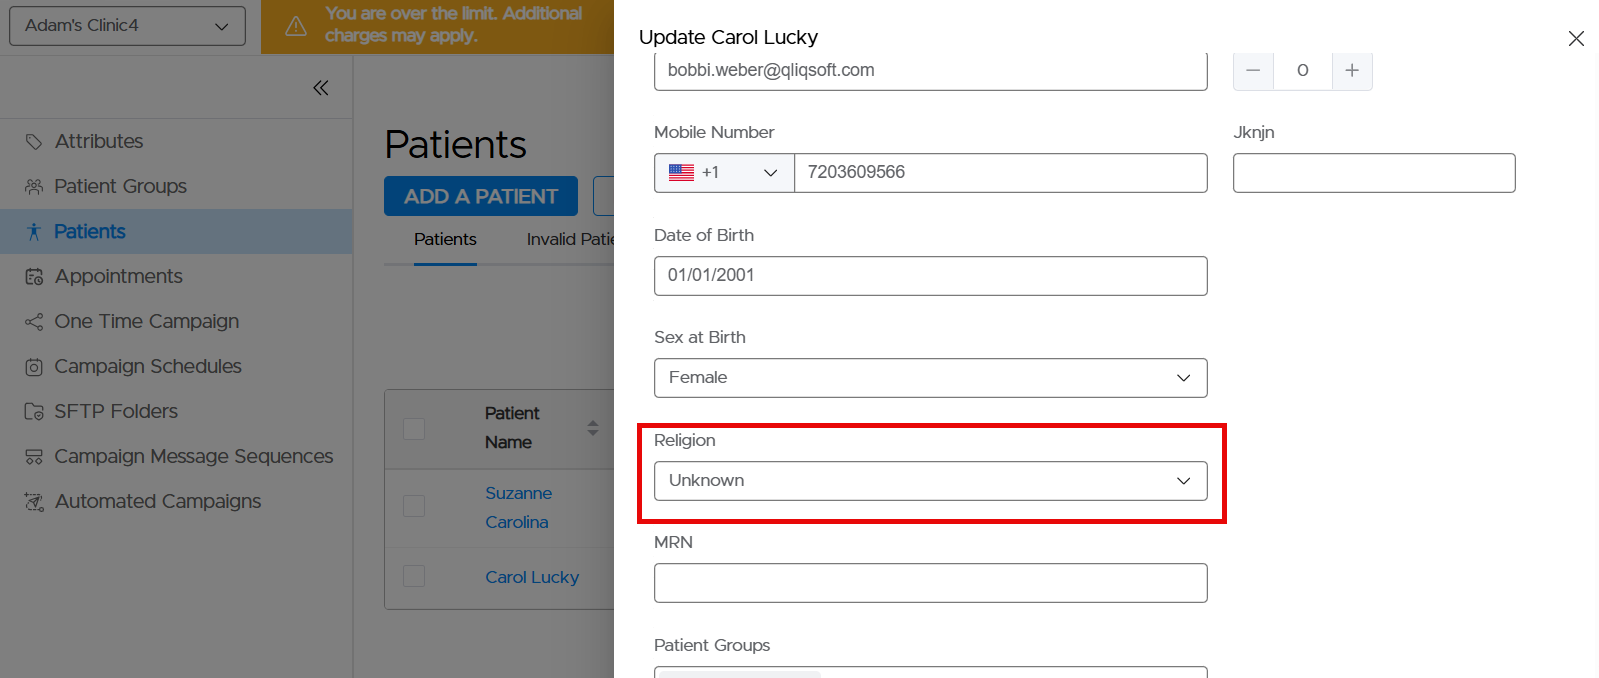
Enter Patient Religion
  • To set a religion, navigate to Care Campaigns, select Patients.  Bulk import patient data using Import Via CSV File. To update an individual patient, select the patient and click on the gear icon, then select Edit Patient.  A new window opens. Navigate to Religion and select one of the options.
Create Special Days Campaign Message Sequence
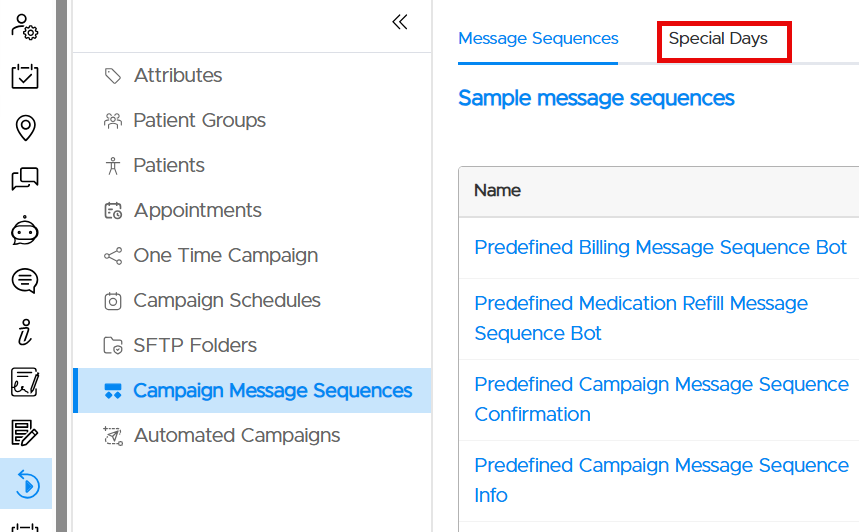
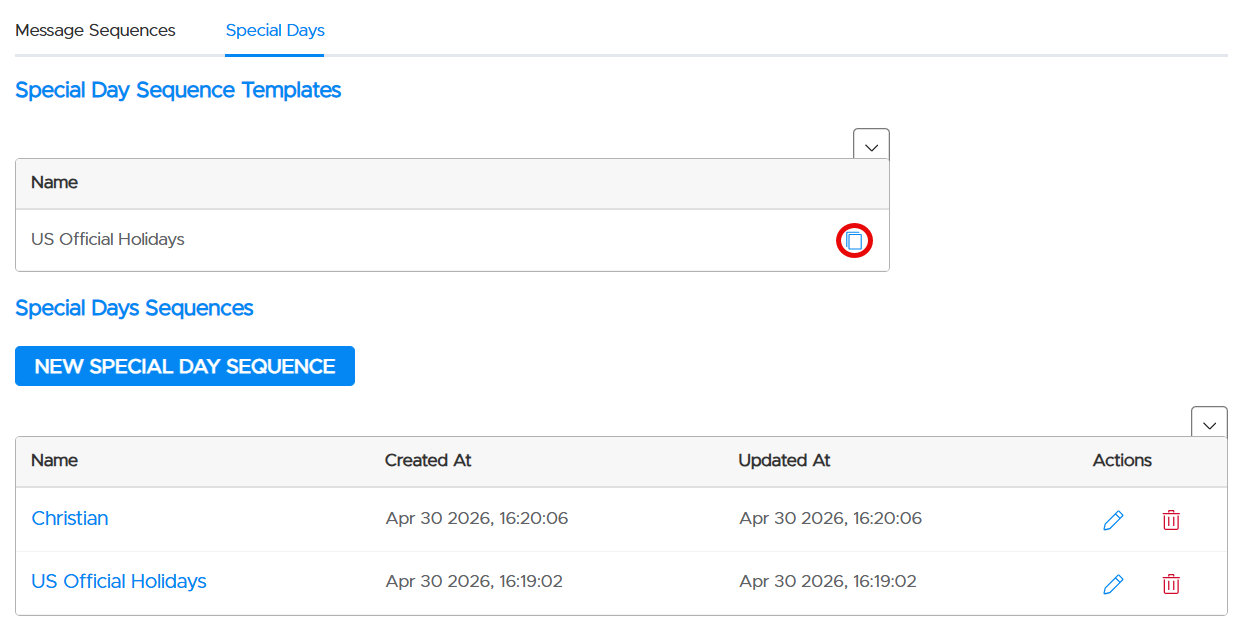
  • Navigate to Campaign Message Sequences and select Special Days.
  • Copy an available template.
  • Add, edit or delete a message block.
  • When a Special Days Sequence includes Religion:
  1. The patient receives a message only if the patient’s religion matches the Special Day orientation
  2. The patient does not receive a message if their religion does not match
  3. If a patient's religion is not defined, Special Day messages with a defined religion are not sent
Create a Special Days Auto Campaign
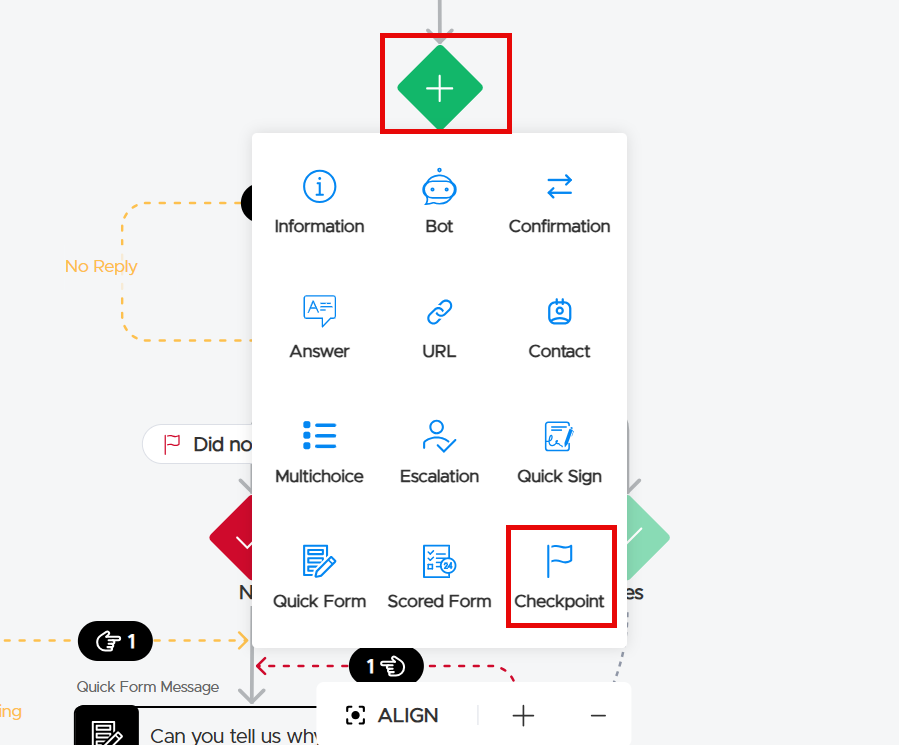
  • Campaign Analytics Checkpoints — Admins can now tag any point in a campaign flow for reporting using a new analytics node, Checkpoint, in the sequence builder. Checkpoints don't send messages or change routing — they simply record that a recipient reached a named milestone (e.g., "Declined Bereavement Messages," "Needs Attention Triggered") for reporting purposes. 
    • Administrators can add Checkpoints to existing or new Care Sequences. To add a Checkpoint, hover over the decision node.  An Insert Node pop-up displays. Select the Checkpoint node and add a name.
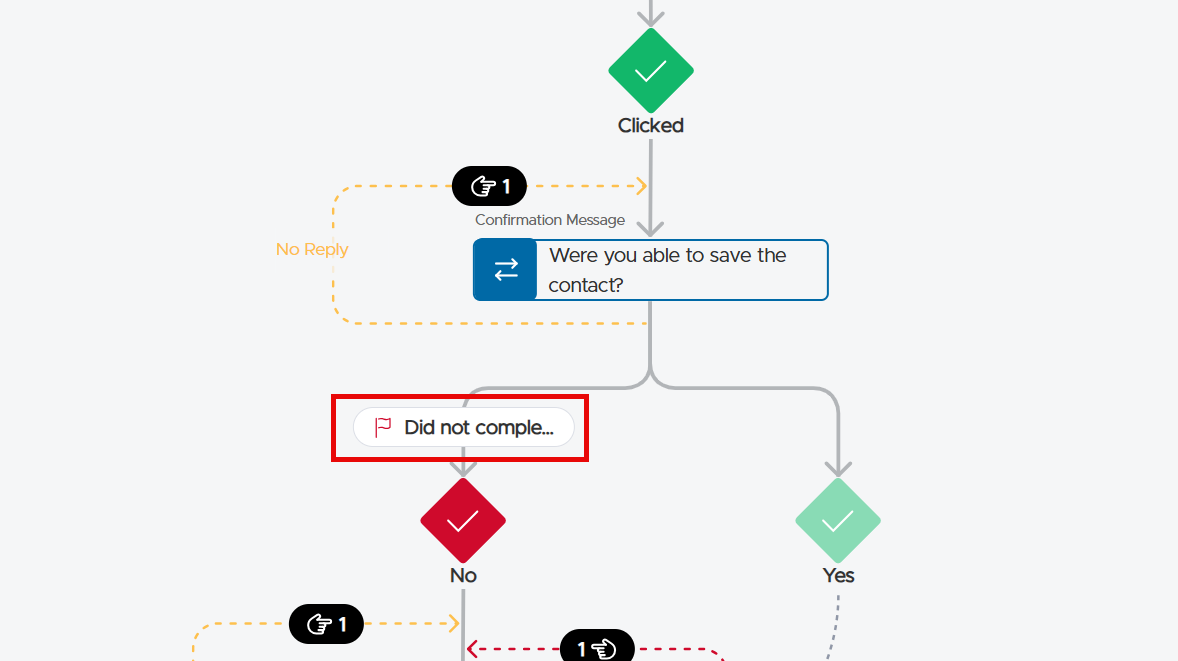
  • Once the Checkpoint has been added, it looks like this in the Care Sequence.
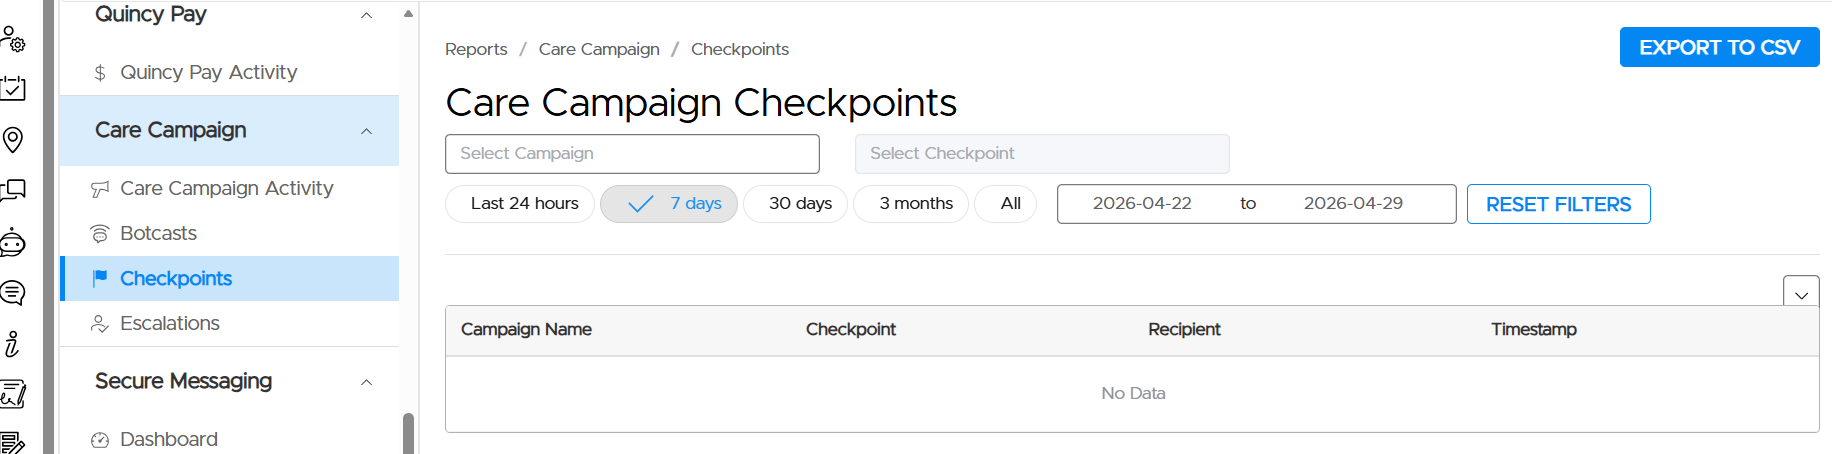
  • A paired Campaign Analytics Checkpoints report lists every recipient who reached each checkpoint, is filterable by campaign, label, and date range, and includes CSV export.
  • To access this report, select Reports. Under Care Campaigns select Checkpoints.

Improvements

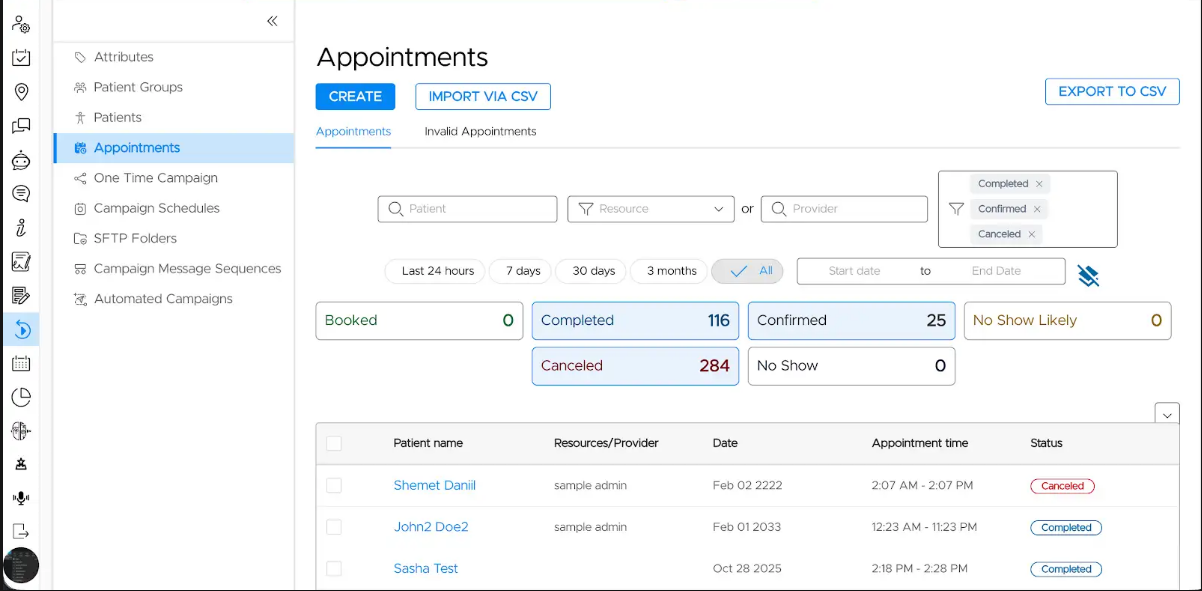
  • Multi-select status filter on Care Campaign — Status boxes on Care Campaigns and Appointments now support toggling multiple statuses at once. 
    • To use this enhancement, select Care Campaigns and then Appointments. Select one or more statuses. To filter on status, click on the desired statuses. To deselect a status, click on it again.
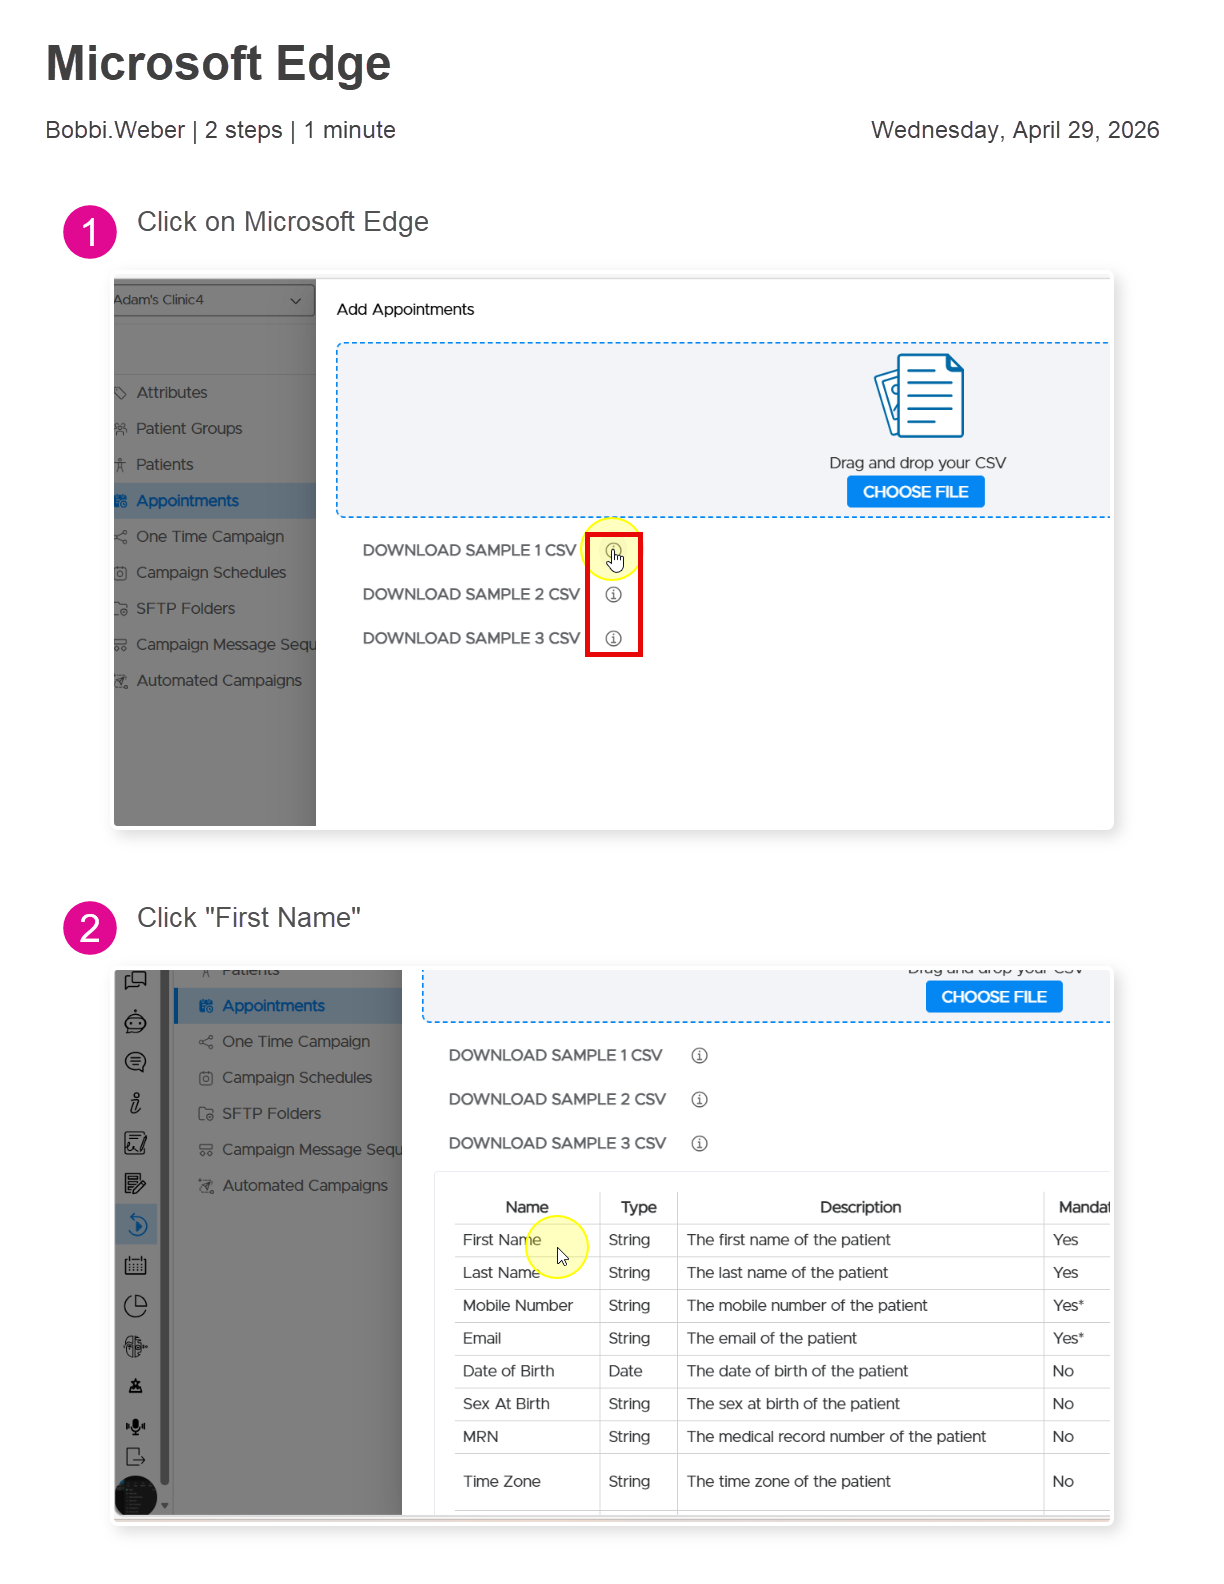
  • Improved CSV import guide for patient and appointment data — There are now embedded  requirements and examples accompanying the downloadable CSV files for both Patients and Appointments.  To access the requirements, click on the information icon to the right of the CSV download. This opens instructions summarizing the type of data accepted, a brief description of the data and if the field is mandatory or optional. 

FAQs

User Profiles

QliqCHAT

Version Number: 

Desktop App

Mobile App

OnCall Scheduling

VisitPath

Fill & Sign

Qliq-Assisted Calling

Admin

Integration & API

Reporting

Improvements

  • Reset Filters button on Reports pages — The Reset Filters button is now present on Trending, Real-Time Translations, Message Activity, Visit Path, Admin Activity, Service Logs, User Activity, and Upload Activity (previously missing), and the inconsistent "Clear Filters" label on Form Submissions has been standardized. 

Bug Fixes

  • Tooltip consistency in Outreach reports — Resolved inconsistencies in tooltip behavior in the Outreach section.

User Management

Improvements

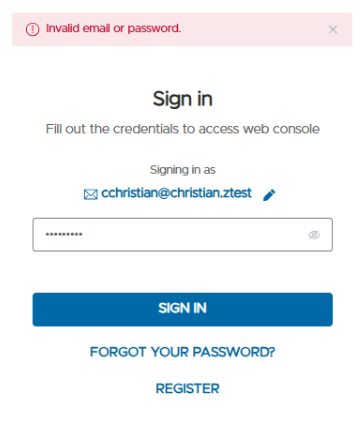
  • Error and status notifications display inside the login tile — Authentication notifications (invalid credentials, expired codes, too many attempts, password errors, success messages) now appear inside the login tile instead of at the top of the page, across login, verification, password entry, and forgot-password screens.

Bug Fixes

  • QliqSTOR and QliqDIRECT system users no longer counted toward members in Usage & Limits — Resolved false member-limit-exceeded notifications caused by these system users being counted as members.
  • 2FA authenticator-app login text corrected — The screen no longer incorrectly tells authenticator-app users that the code was sent to email. Updated to: "To help keep your account secure, enter the verification code from your authenticator app."

QliqSTOR

QliqDIRECT